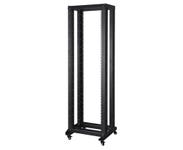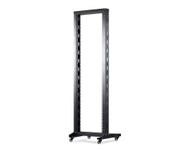
Open Frame Server Racks
-
Hypertec R19 Open Frame 2 Post 42RU 600DItem Number: HR2P42RU6-SPackaging Unit: 1 / eachLoading price...
$0.00 -
Hypertec R19 Open Frame 4 Post 42RU 600DItem Number: HR4P42RU6-SPackaging Unit: 1 / eachLoading price...
$621.96 -
Redback OF Rack 42RU 520W 2122H - Floor StandingItem Number: DR.5042Packaging Unit: 1 / eachLoading price...
$636.09 -
Redback OF Rack 42RU 600W 600D 1935H - Floor StandingItem Number: OR.6642Packaging Unit: 1 / eachLoading price...
$498.23
How to Install Network Equipment in Open-Frame Data Racks
Open-frame data racks are mostly renowned for their exceptional airflow and lower cost, unlike closed cabinets that offer physical safety. If you’re installing network equipment in open-frame data racks, remember it is more about smooth future expansion, air flow, weight balance, cable management, and practicality.
Since it is open, it will reveal your mistakes. But what if you don’t make a mistake? That is possible when you follow our quick 6-step installation guideline.
STEP-1: Choose your open-frame rack
Decide on your requirements, whether you have heavy or lightweight equipment. There are 2 categories of open-frame racks: 2-post and 4-post.
If you are working with only patch panels, switches, or lightweight equipment, go for a 2-post open-frame.
If you’re working with heavy equipment like servers or UPS, go for a 4-post open-frame.
Common mistakes to avoid:
- When adding service loops, ensure that you add loose loops
- Maintain sufficient distance between the SFP/fibre and tight bends
- Avoid stacking cables in front of the switch port
STEP-2: How to organize the rack before mounting?
Organize your rack vertically(top to bottom) so that you don’t need to move equipment later.
- Always leave an 25% extra space when planning so that future expansion becomes easier
- Keep patch panels, switches, and other go-to items at eye level, so you don’t need to explore the rack repeatedly. But keeping patch panels above switches is highly recommended
- To enable ventilation above high-heat devices, like servers, leave a minimum of 1U extra space
Now comes the main factor: weight distribution
- Top: Keep lightweight items, like fibre trays or cable managers, at the top because gravity supports cable paths
- Tier below top: Prefer keeping patch panels here because then you need shorter patch leads to switches that are placed below
- Tier above bottom: Since panels are placed above, you can keep routers or core switches that enable smooth cable routing down lower but still close to the patch panels
- Bottom: Because of the low center of gravity, here you can keep all the large and heavy equipment, like UPS or servers
STEP-3: Gather your tools
First, gather the required tools: cage nut tool, washers, a tape measure, a flashlight, a wrench set, a screwdriver set, a level, and a label maker. Choose rack studs and a cage nut tool over screws for a faster process. A cage nut can also prevents finger injuries.
Start installing rails and shelves as you recognize the mounting pattern(1 U, 2 U, or other). Connect inner rail sections to the servers before placing them into the rack.
STEP-4: Mounting the heavier equipments
Place your rack in a fixed location where sufficient space for ventilation on all sides is available. If your rack has wheels, lock them once the location is fixed.
Install outer rails and shelves horizontally to the rack and fix them with screws as per the manufacturer’s description.
Now start mounting with heavier equipment(servers, UPS, large switches) first, which goes to the bottom of the rack.
In the next tier are patch panels, both copper and fibre, which offer smooth patch lead routing.
For cable management, use cable managers between patch panels and switches. Use the sandwiching technique to place them vertically:
- Cable manager (horizontally)
- Patch panel
- Cable manager (horizontally)
- Switch
Cable management
Since we are dealing with open-frame racks, all our cables will be visible. So to prevent any mess, we use cable managers both horizontally and vertically around the rack. Place the vertical cable manager on the sides of the rack and the horizontal cable managers between the switch and the patch panel. Route cables first vertically, then horizontally.
To secure cable bundles, use Velcro or hook and loop straps in place of cable ties or zip ties, which can harm the cable jackets by overtightening them.
Run power cables and data cables at opposite sides of the rack to prevent electromagnetic interference.
STEP-6: Mounting the lightweight equipments
Under the patch panel go switches, both having 1-24 ports, and organized by a cable manager in between. While placing, ensure the port numbers match, switch 1 to panel 1, switch 2 to panel 2, and so on. For an uncluttered look, choose short patch cables of length 0.3 mtr to 1 mtr.
The next crucial step is labeling because it makes troubleshooting alot easier. Label each end of every cable with its function or destination. Label each device, RU-position, and every patch panel port. Give the same code to the same ports of the patch panel and switch.
Patch panel 1 - 001 -> switch 1 - 001 -> “destination/function” 001
Install a PDU, i.e., power distribution unit, at the side or back of the rack so that all equipment power cords can get quick access.
Concluding measures
- Ensure that cable bundles do not block airflow and that all the fans are working properly
- Grounding is necessary to avoid electrical risks. Make sure all the equipment and racks are grounded well.
- Extend all the stabilizers so that the rack does not jiggle when you access any equipment
Your ordered quantity for this item is more than what we have in stock.
Stock Availability
| Location | |
|---|---|
Please contact us to know more about this item's availability or possible restock dates.